QC Photos Masterclass — How to Read Quality Control Photos and Never Get a Bad Replica Watch
Last updated: March 2026 • 22-minute read • By Patrick Harmon
QC photos — quality control photos — are the difference between a confident purchase and a gamble. They’re detailed photographs of your specific watch taken before it ships. Not stock images. Not marketing photos. Your actual piece, examined under controlled lighting from every angle that matters. This guide teaches you exactly what to look for in every QC photo, when to GL (Green Light — approve), when to RL (Red Light — reject), and the specific flaws that separate a keeper from a send-back. After reading this, you’ll evaluate QC photos like a professional.
Table of Contents
- 01 What Are QC Photos and Why They Matter
- 02 GL vs RL — When to Approve, When to Reject
- 03 Dial Alignment — The First Thing to Check
- 04 Bezel Alignment & Insert Quality
- 05 Date Window & Cyclops
- 06 SEL (Solid End Links) Gaps
- 07 Rehaut Alignment
- 08 Case Finishing & Crown
- 09 Timegrapher Results — Reading the Numbers
- 10 Brand-Specific QC Checks
- 11 The Complete QC Checklist
- 12 FAQ — 15 QC Questions Answered
What Are QC Photos and Why They Exist
Every super clone watch that leaves a factory is a handmade product. Even the best factories — Clean, VSF, APS — produce pieces with minor variations. One Submariner’s bezel might be perfectly aligned. The next one’s bezel sits 0.5mm clockwise. Both pass the factory’s internal standards. But a discerning buyer might accept the first and reject the second.
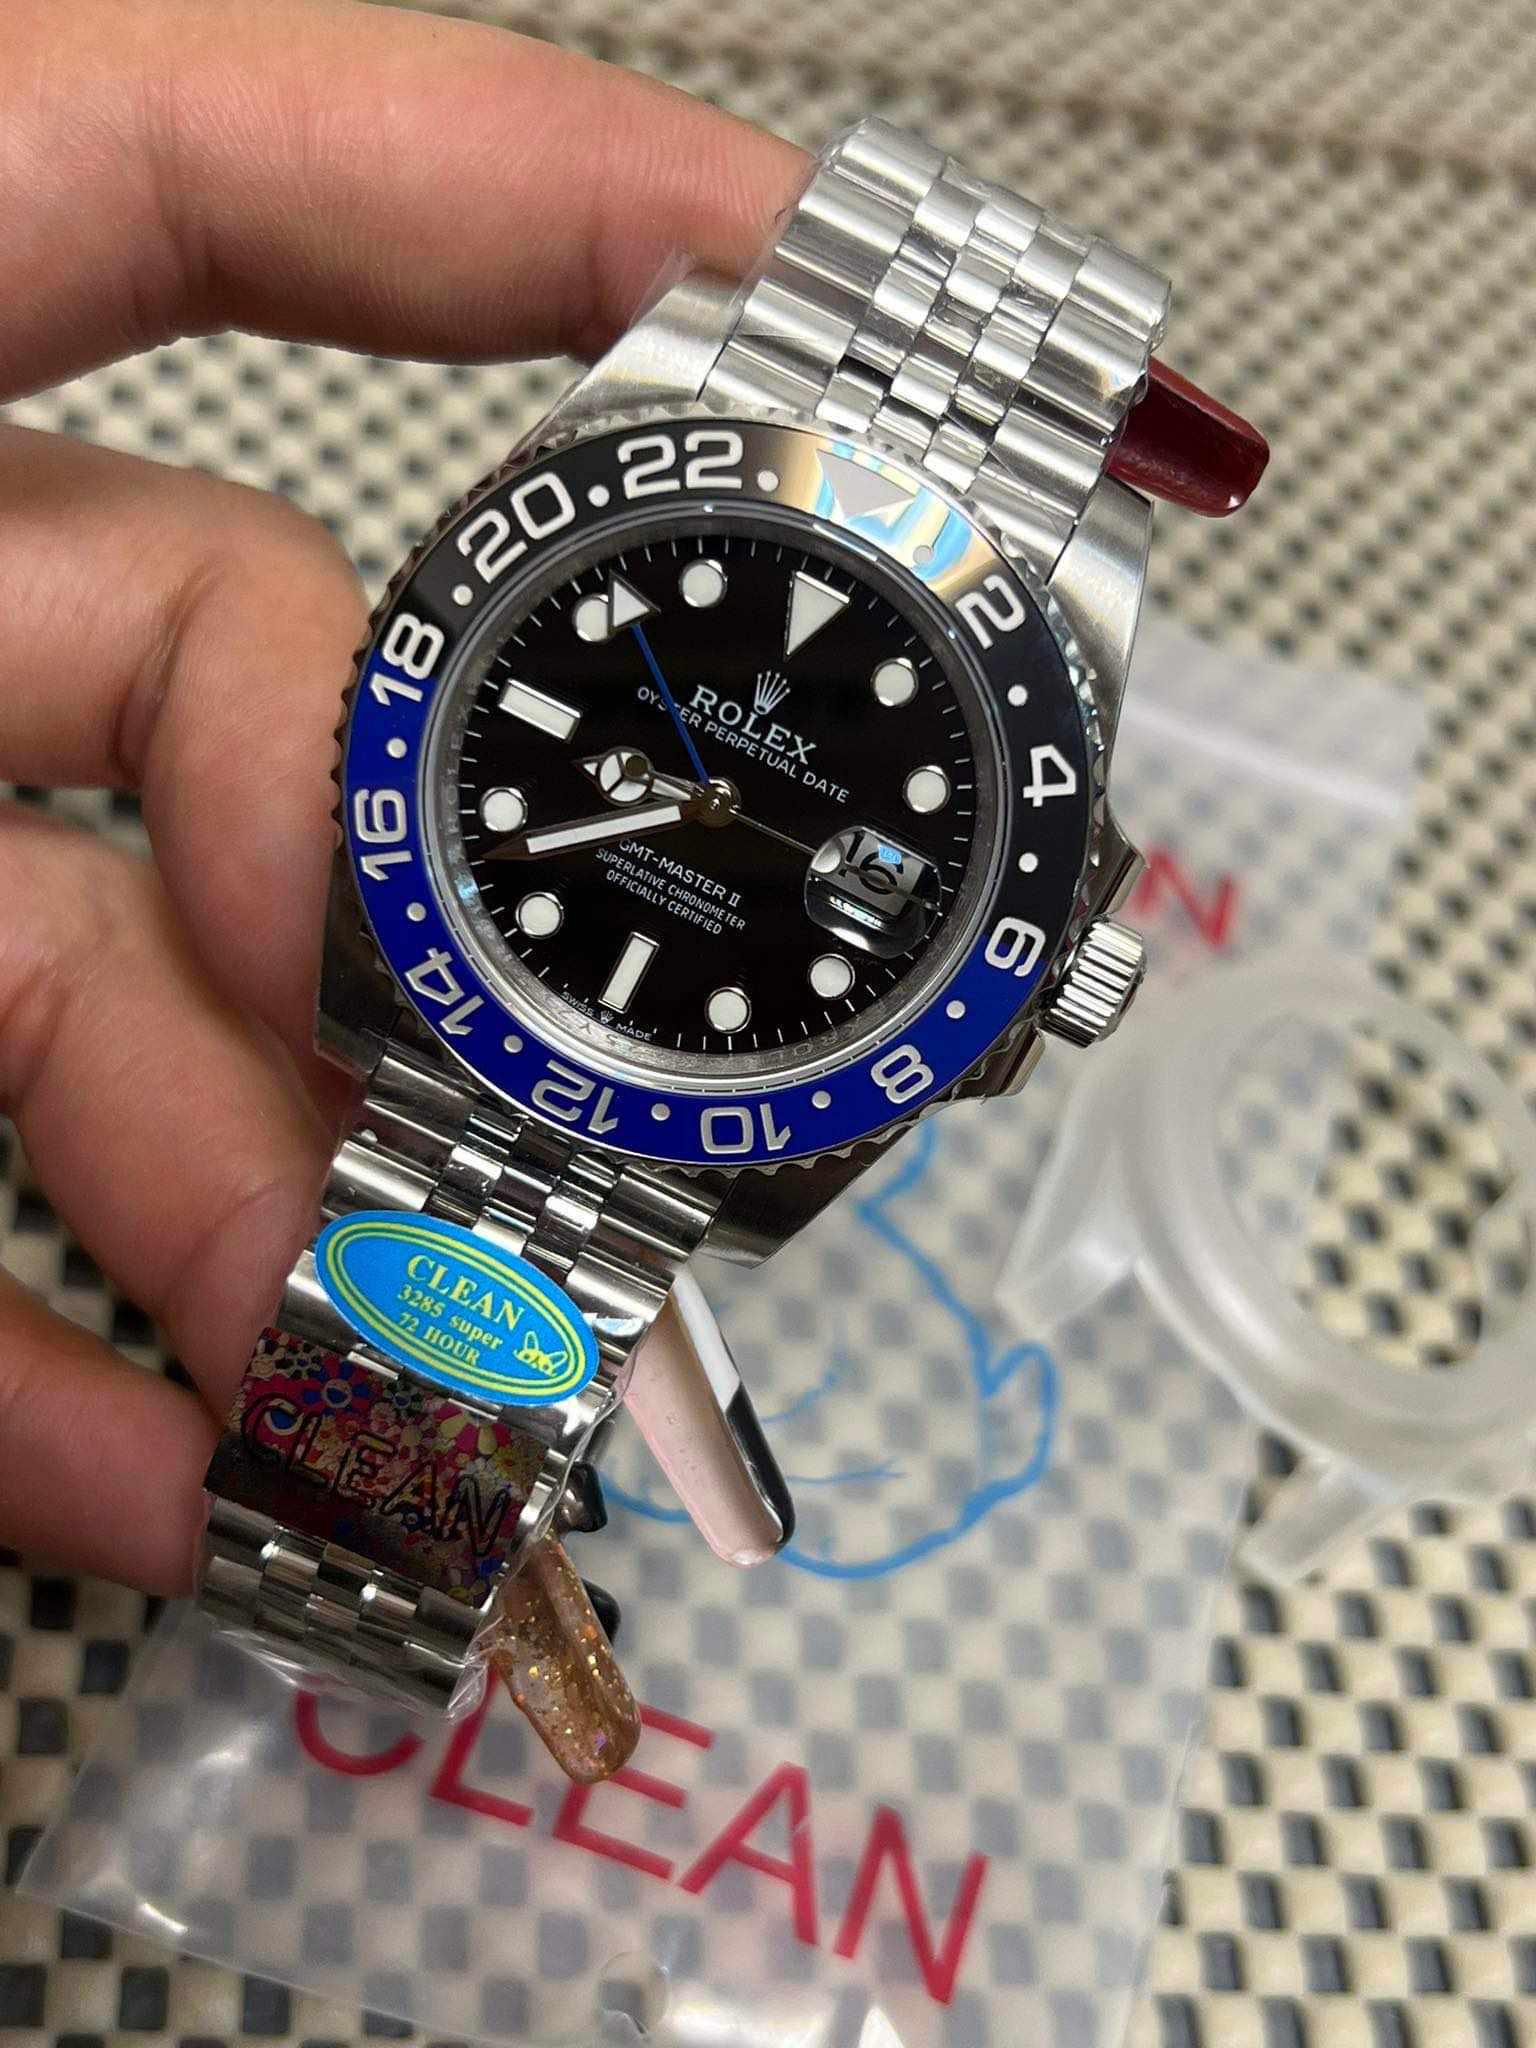
QC photos solve this problem. Before your watch ships, we photograph it from 8-12 angles under controlled lighting. You review these photos, compare against known standards, and make a decision: GL (Green Light — approve and ship) or RL (Red Light — reject and source another piece). This process gives you control over exactly which watch reaches your wrist.
A standard QC photo set includes: front dial (straight on), front dial (angled for light reflection), date window close-up, bezel alignment, case side profile, case back, bracelet clasp, lug/SEL gaps, and a timegrapher reading. Some dealers include lume shots and crown close-ups. The more photos, the better your evaluation.
GL vs RL — The Decision Framework
The most common mistake new buyers make: RLing (rejecting) a piece for issues that only exist in photos but not on the wrist. Camera angles, lighting, and macro close-ups exaggerate flaws that are invisible at arm’s length. Before you RL, ask yourself: “Would I notice this while wearing the watch in real life?”
✓ GL (Green Light) — Accept These
- Bezel misalignment < 0.5mm (barely visible)
- Date wheel slightly left/right within cyclops frame
- Minor dust particle under crystal (can be cleaned)
- Timegrapher shows ±5 s/day (easily regulated)
- SEL gap < 0.3mm (invisible on wrist)
- Subtle dial color shift under different lights (normal)
- Minor rehaut misalignment at one position only
✗ RL (Red Light) — Reject These
- Dial visibly crooked (text not parallel to bezel)
- Bezel misalignment > 1mm (visible at arm’s length)
- Cyclops not centered over date window
- SEL gap > 0.5mm (visible daylight between case/bracelet)
- Timegrapher shows > ±15 s/day or amplitude < 250
- Scratches or finishing defects on case/bracelet
- Wrong dial color (different shade than reference)
- Missing or damaged lume dots
Pro Tip: Don’t compare your QC photos to macro photography of genuine watches found online. Those are shot with $5,000 lenses at 10x magnification — even genuine Rolex watches show “flaws” at that level. Compare to other QC photos of the same factory and model to understand what’s normal for that production run.
Dial Alignment — The First Thing to Check
Dial alignment is the single most important QC check. If the dial is crooked, nothing else matters — the watch will look wrong on your wrist every time you check the time. Here’s how to verify it:
Step 1: Draw an imaginary vertical line from the 12 o’clock marker through the center of the dial to the 6 o’clock marker. This line should bisect the “Rolex” (or brand) text perfectly. If the logo is shifted left or right, the dial is misaligned.
Step 2: Check the coronet/logo at 12 o’clock. It should be perfectly centered between the two index markers. If it’s visibly closer to one side, that’s a dial alignment issue.
Step 3: Compare the spacing between the edge of the dial and each hour marker around the full circumference. The spacing should be uniform. If the 3 o’clock marker is closer to the edge than the 9 o’clock marker, the dial is off-center.
Tolerance: Perfectly centered = GL. Up to 0.3mm offset = GL (invisible on wrist). More than 0.5mm = RL.
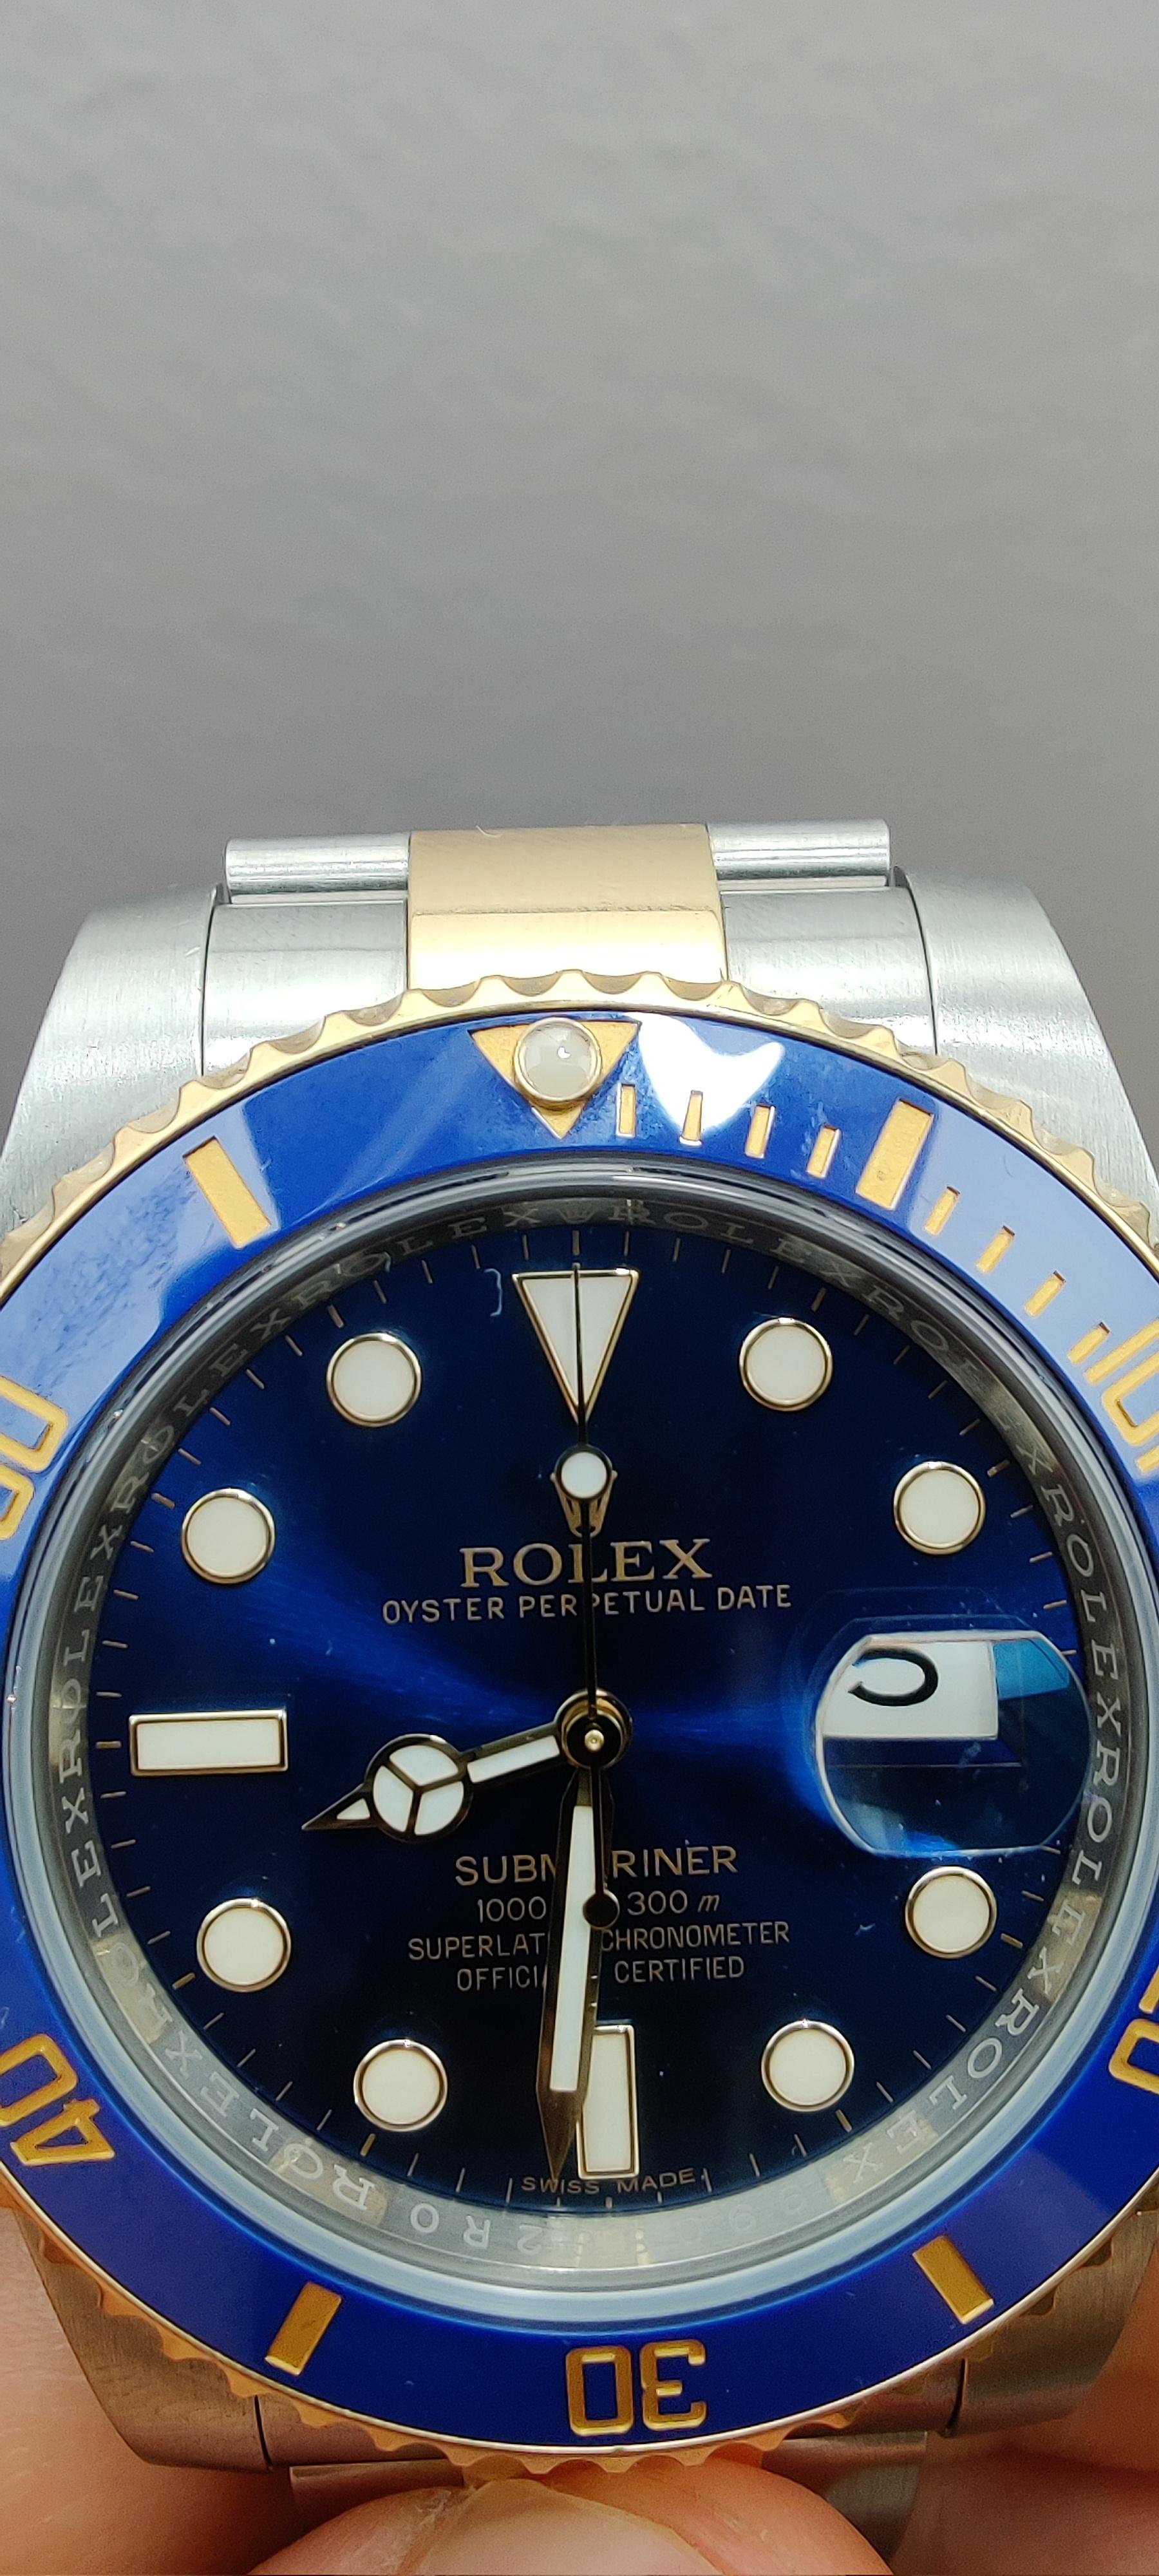
Bezel Alignment & Insert Quality
The bezel triangle at 12 o’clock should align directly with the 12 o’clock index on the dial. This is the most commonly raised QC concern — and also the most over-RLed issue. Why? Because the bezel on a Submariner rotates in 120 clicks. Each click moves the bezel by 3 degrees. If the bezel is one click off, that’s 3 degrees — visible in a close-up photo but barely noticeable on the wrist.
True bezel misalignment means the bezel doesn’t align even when rotated to the correct click position. This indicates a manufacturing issue with the click spring or the bezel insert placement. This is an RL.
Bezel insert quality: Check the numbers and markers on the insert. On a ceramic bezel, the numbers should be filled evenly (platinum fill on Submariner, white enamel fill on GMT). Uneven fill — where one number is brighter/dimmer than others — is a valid RL reason. The matte texture of the ceramic should be uniform without shiny spots or rough patches.
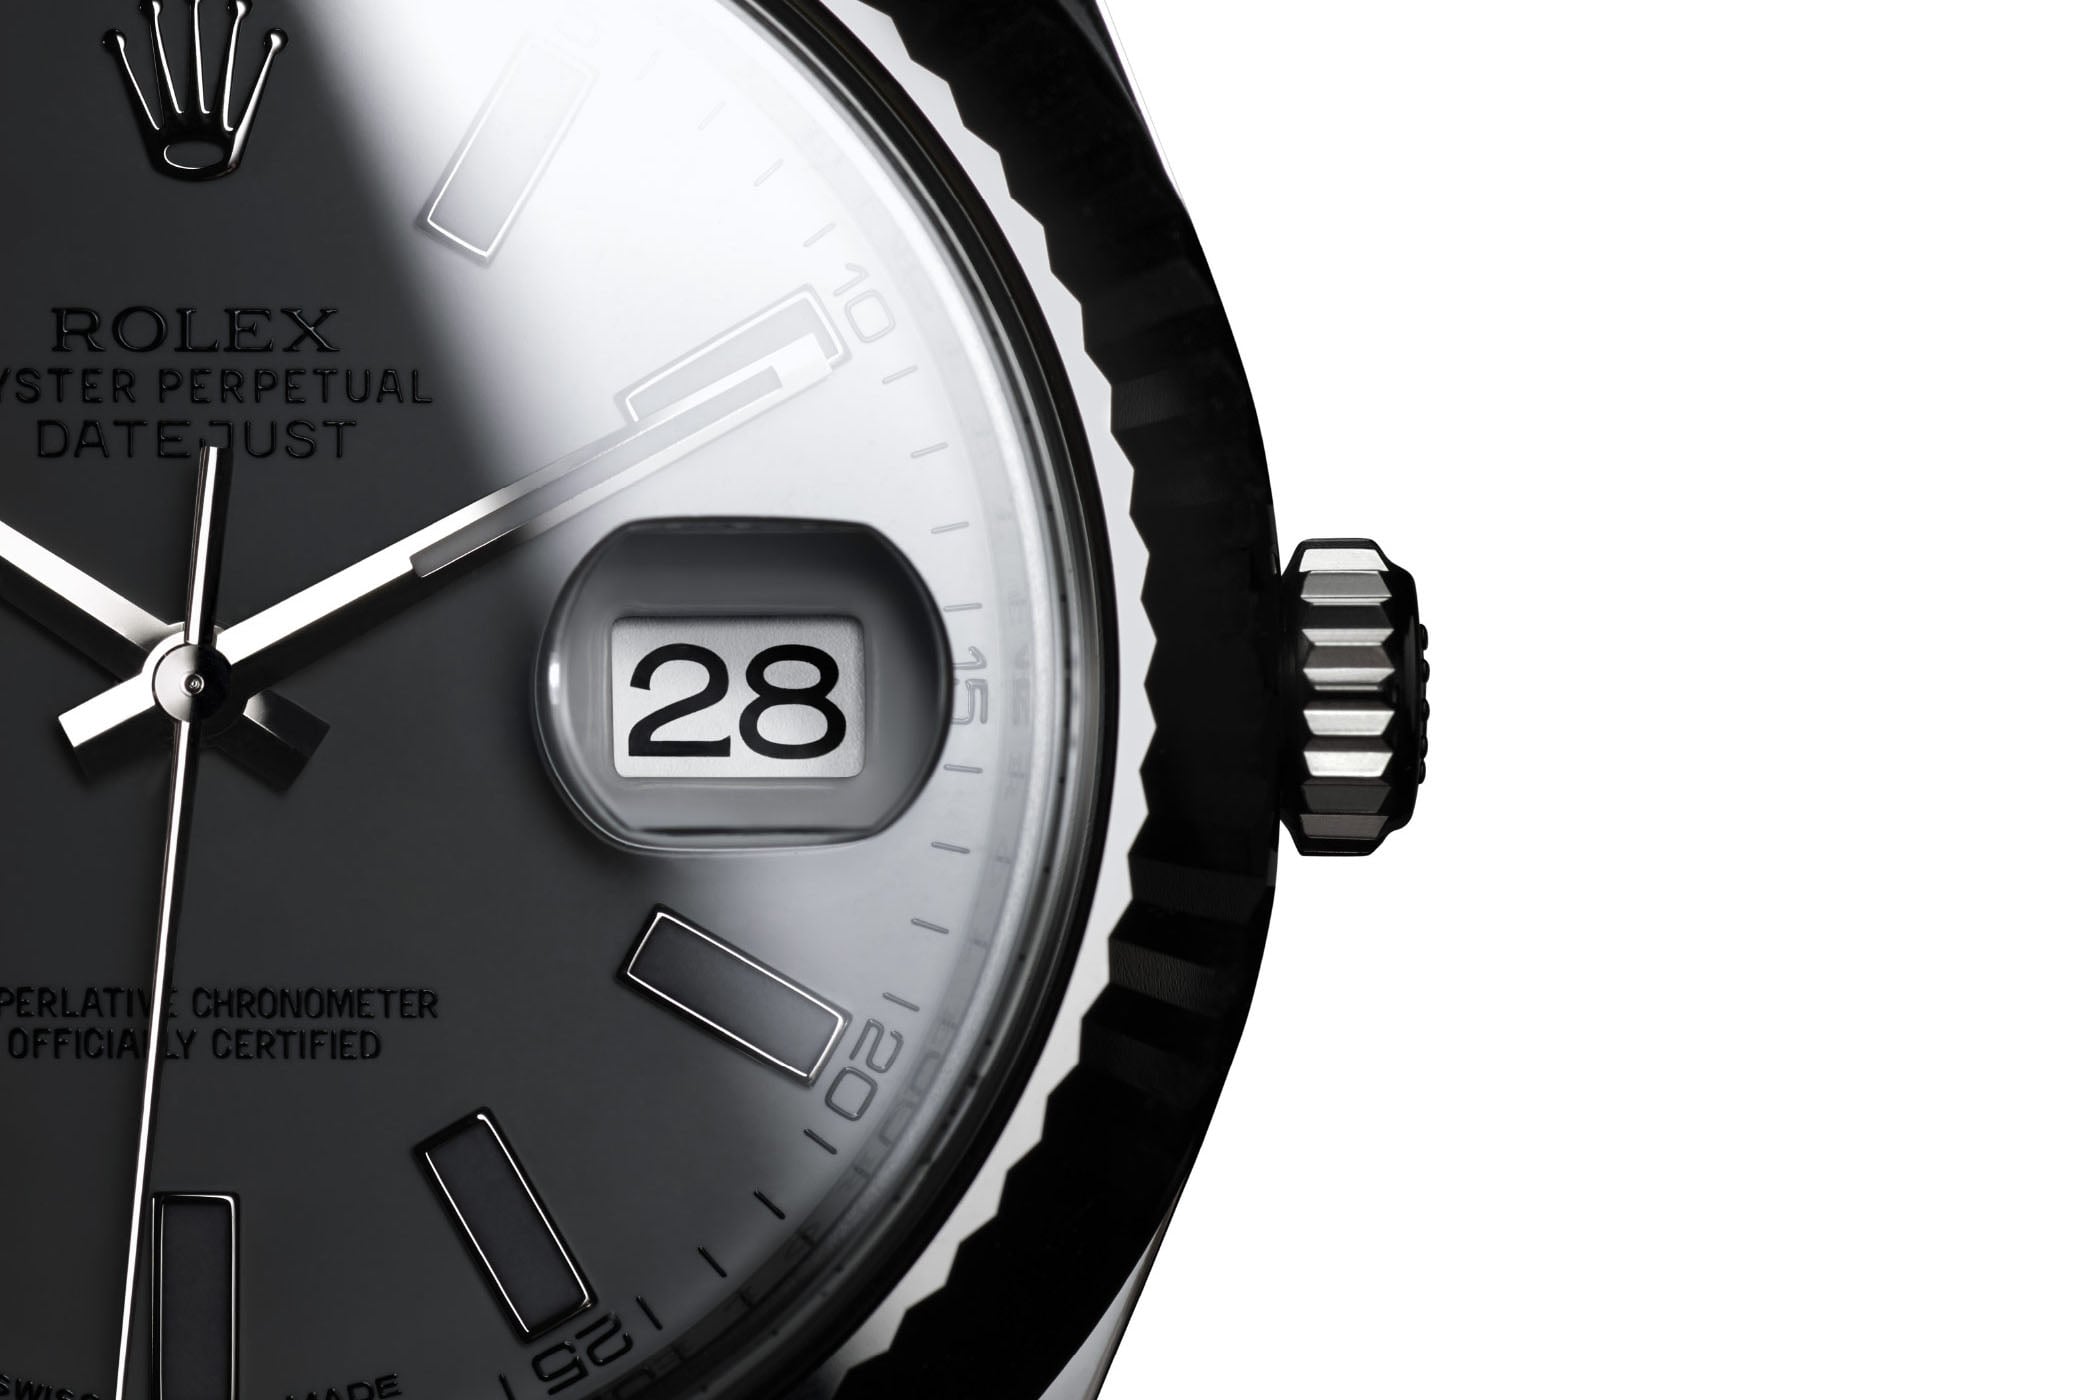
Date Window & Cyclops — The Magnification Test
The date window check has three components:
1. Cyclops alignment: The cyclops lens should be centered directly over the date window. If you can see more of the date window on one side of the cyclops than the other, it’s misaligned. Minor offset (<0.3mm) is GL. Visibly off-center is RL.
2. Date centering: The date numeral should be centered within the date window frame. It should not touch the left, right, top, or bottom edge of the window. Vertical centering is more important than horizontal — a date that sits too high or too low is more noticeable than one that’s slightly left or right.
3. Font quality: The date font should be clean and consistent. On Rolex models, the font is a specific style with open 6s and 9s. The ink should be uniformly black (white dial) or white (dark dial). Fuzzy printing or inconsistent ink density = RL.
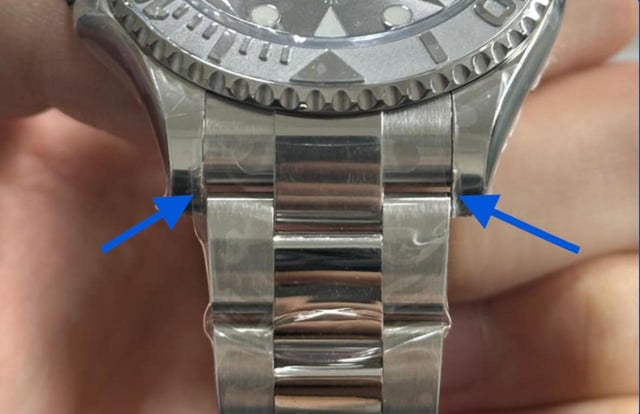
SEL (Solid End Links) — The Bracelet-to-Case Fit
Solid End Links connect the bracelet to the case between the lugs. On a genuine Rolex (and on a proper super clone), the SEL should curve to follow the exact contour of the case with zero visible gap. This is one of the most reliable indicators of build quality.
How to check: Look at the QC photo showing the 6 o’clock or 12 o’clock end of the bracelet where it meets the case. There should be no daylight visible between the end link and the case. If you can see a gap, note its size. Gap < 0.3mm = GL (invisible when worn). Gap > 0.5mm = RL. Also check both sides — sometimes one SEL fits perfectly while the other has a gap.
Clean Factory has the tightest SEL fit in the Rolex replica market. VS Factory is close behind. BT and BP factories consistently have looser SEL fits — it’s a known weakness of their production.

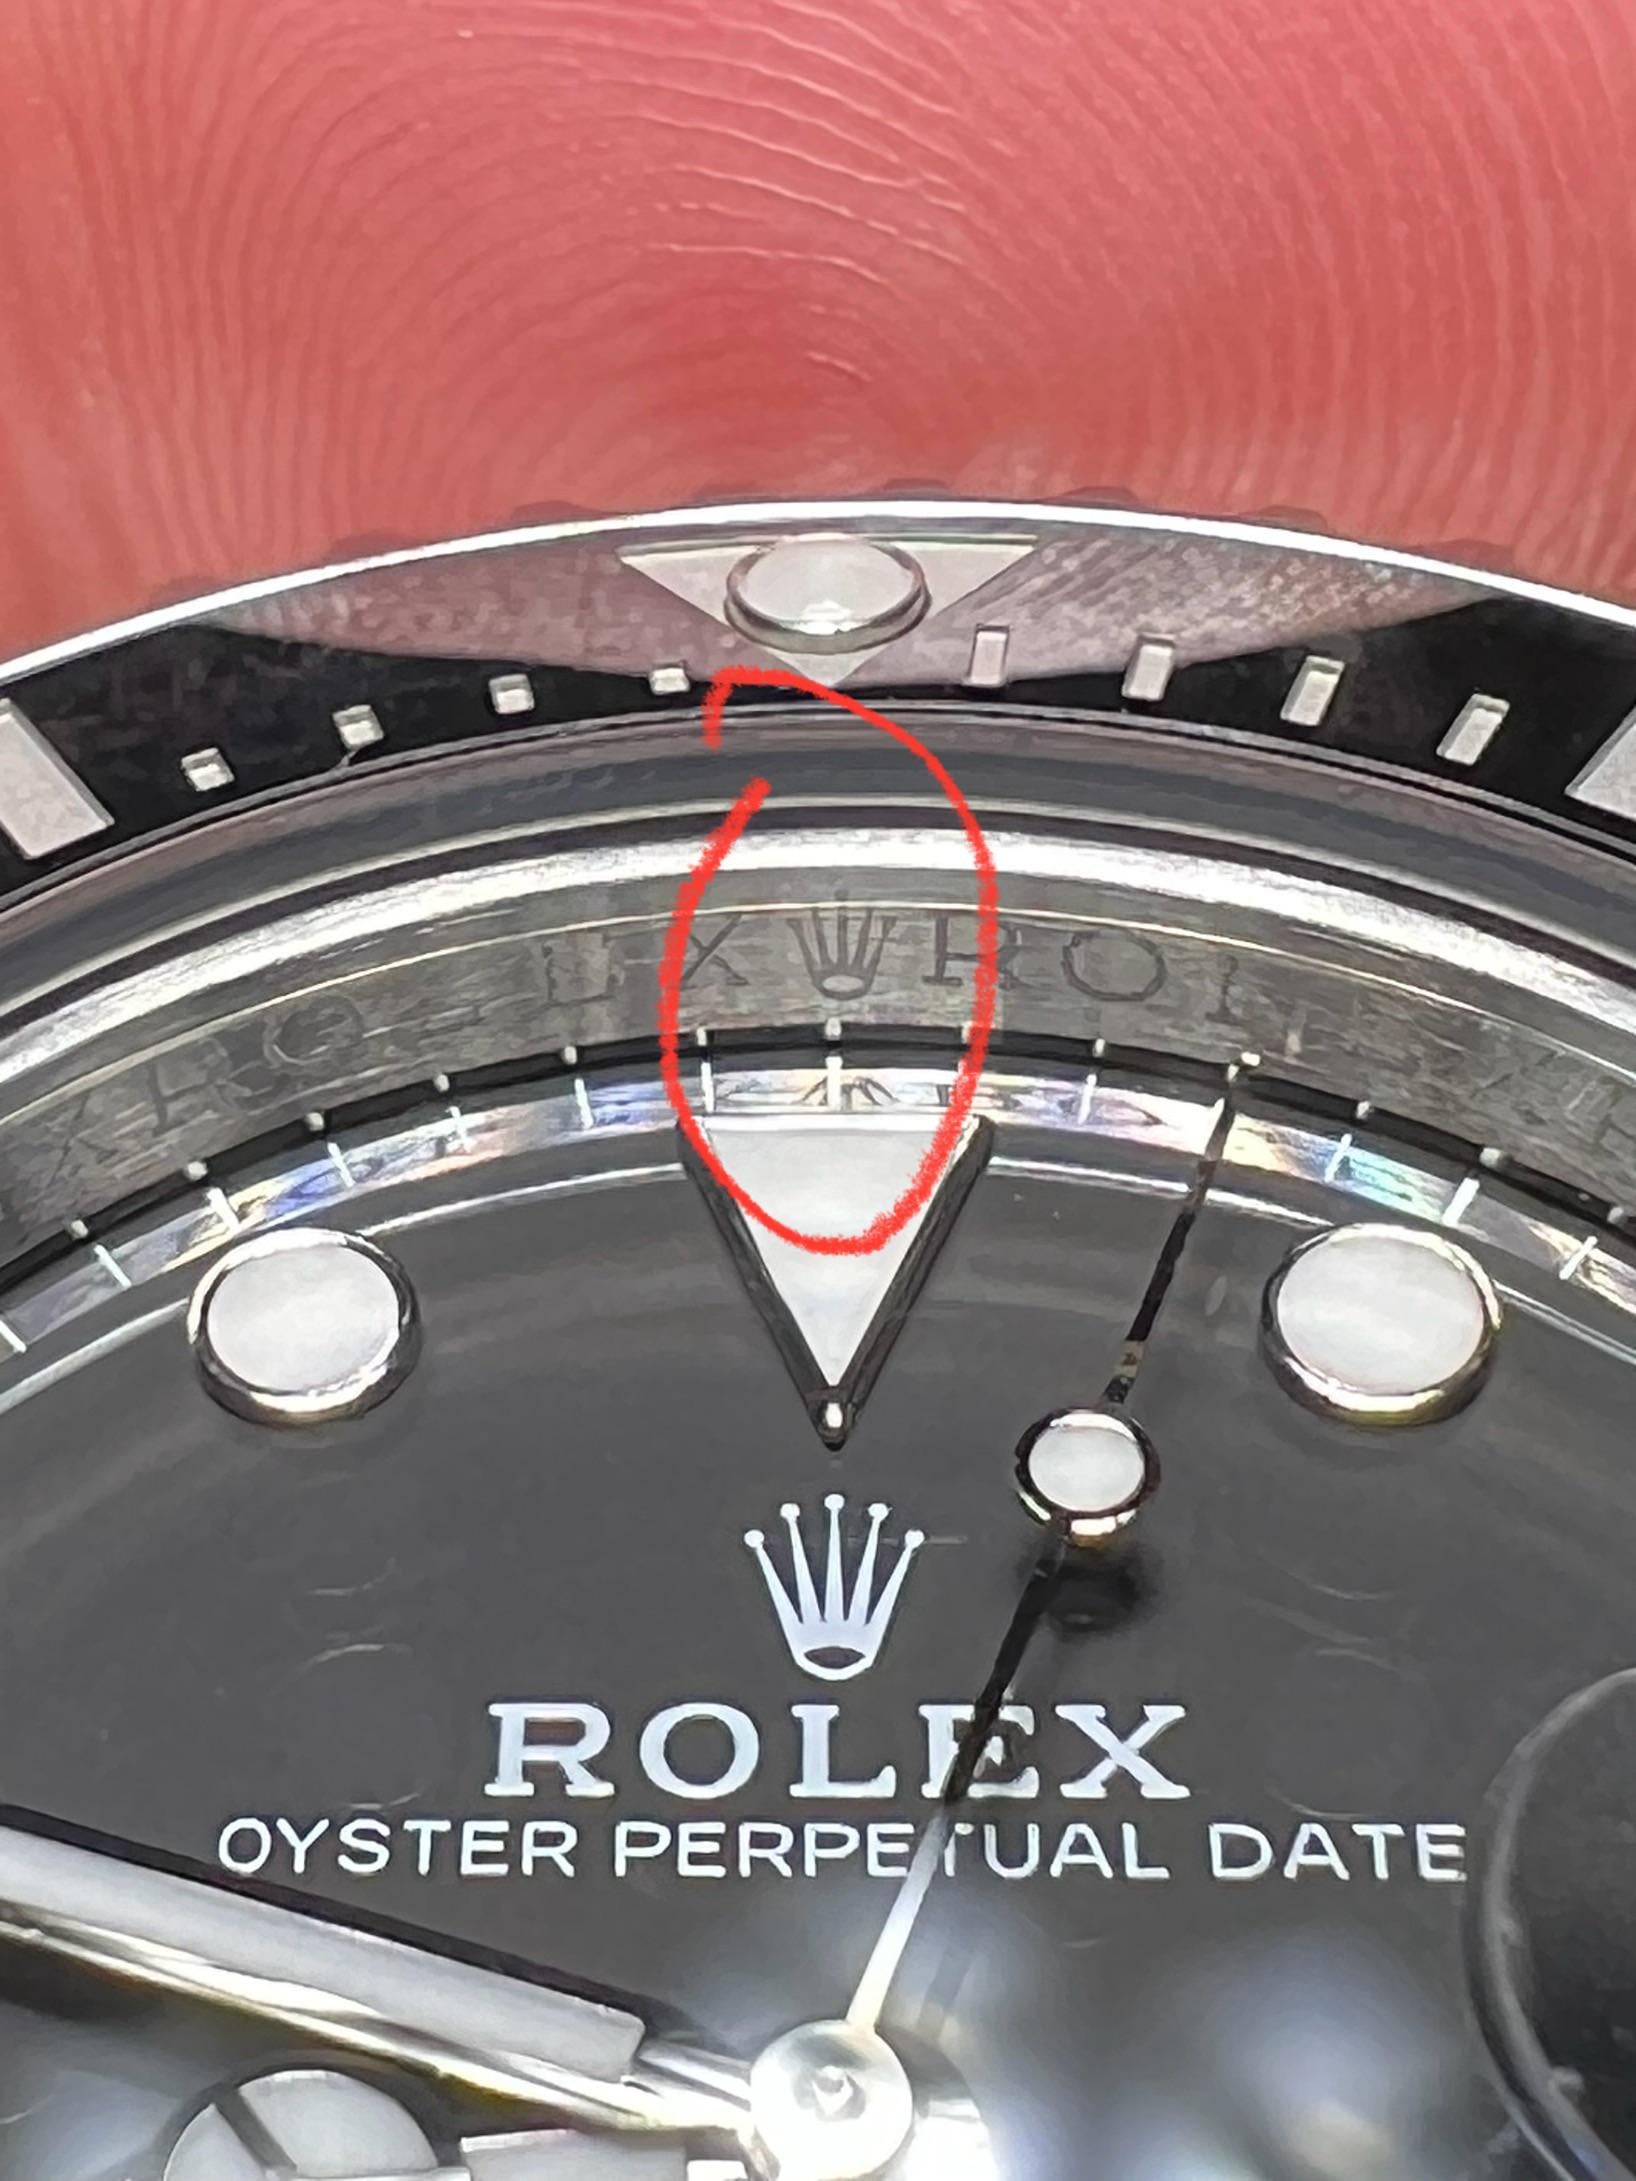
Rehaut Alignment — The Inner Ring
The rehaut is the inner ring of the watch case, visible between the dial and the crystal. On modern Rolex models, it’s engraved with “ROLEX ROLEX ROLEX” repeatedly. The critical check: the “X” in ROLEX at the 12 o’clock position should align with the 12 o’clock index. Similarly, the engravings at 3, 6, and 9 o’clock should align with their respective markers.
Perfect rehaut alignment around the entire circumference is rare even on genuine Rolex watches. What you’re looking for is alignment at 12 o’clock (most important), 6 o’clock (second most visible), and then 3 and 9. If 12 o’clock is aligned and the others are close, that’s a GL. If even 12 o’clock is visibly off, that’s an RL for most discerning buyers.
Case Finishing & Crown — The Detail Check
Case finishing tells you about the overall manufacturing quality. Check these specific areas in QC photos:
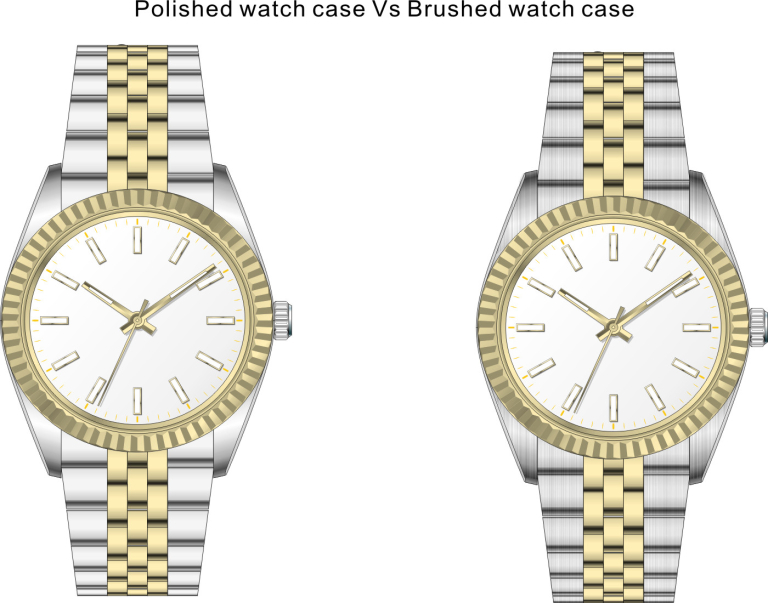
Lug chamfers: The beveled edges on the lugs should be sharp, straight, and uniformly polished. Rounded or wavy chamfers = lower manufacturing tolerance. This is a known tell on cheaper factories.
Brushed/polished transitions: On a Submariner, the sides of the case are polished and the top surfaces are brushed. The line between these two finishes should be razor-straight. A wobbly transition line indicates hand-finishing rather than machine-finishing.
Crown operation: QC photos can’t show this directly, but a good dealer will note any crown issues. The crown should screw down smoothly with resistance at the final turn. Winding should feel progressive and smooth, not gritty or loose.
Case back: Check engravings for depth and clarity. On models with display case backs (Omega, AP, Patek), verify the movement looks correct — right rotor style, proper decoration pattern, correct bridge layout. Our factory guide shows what each movement should look like.
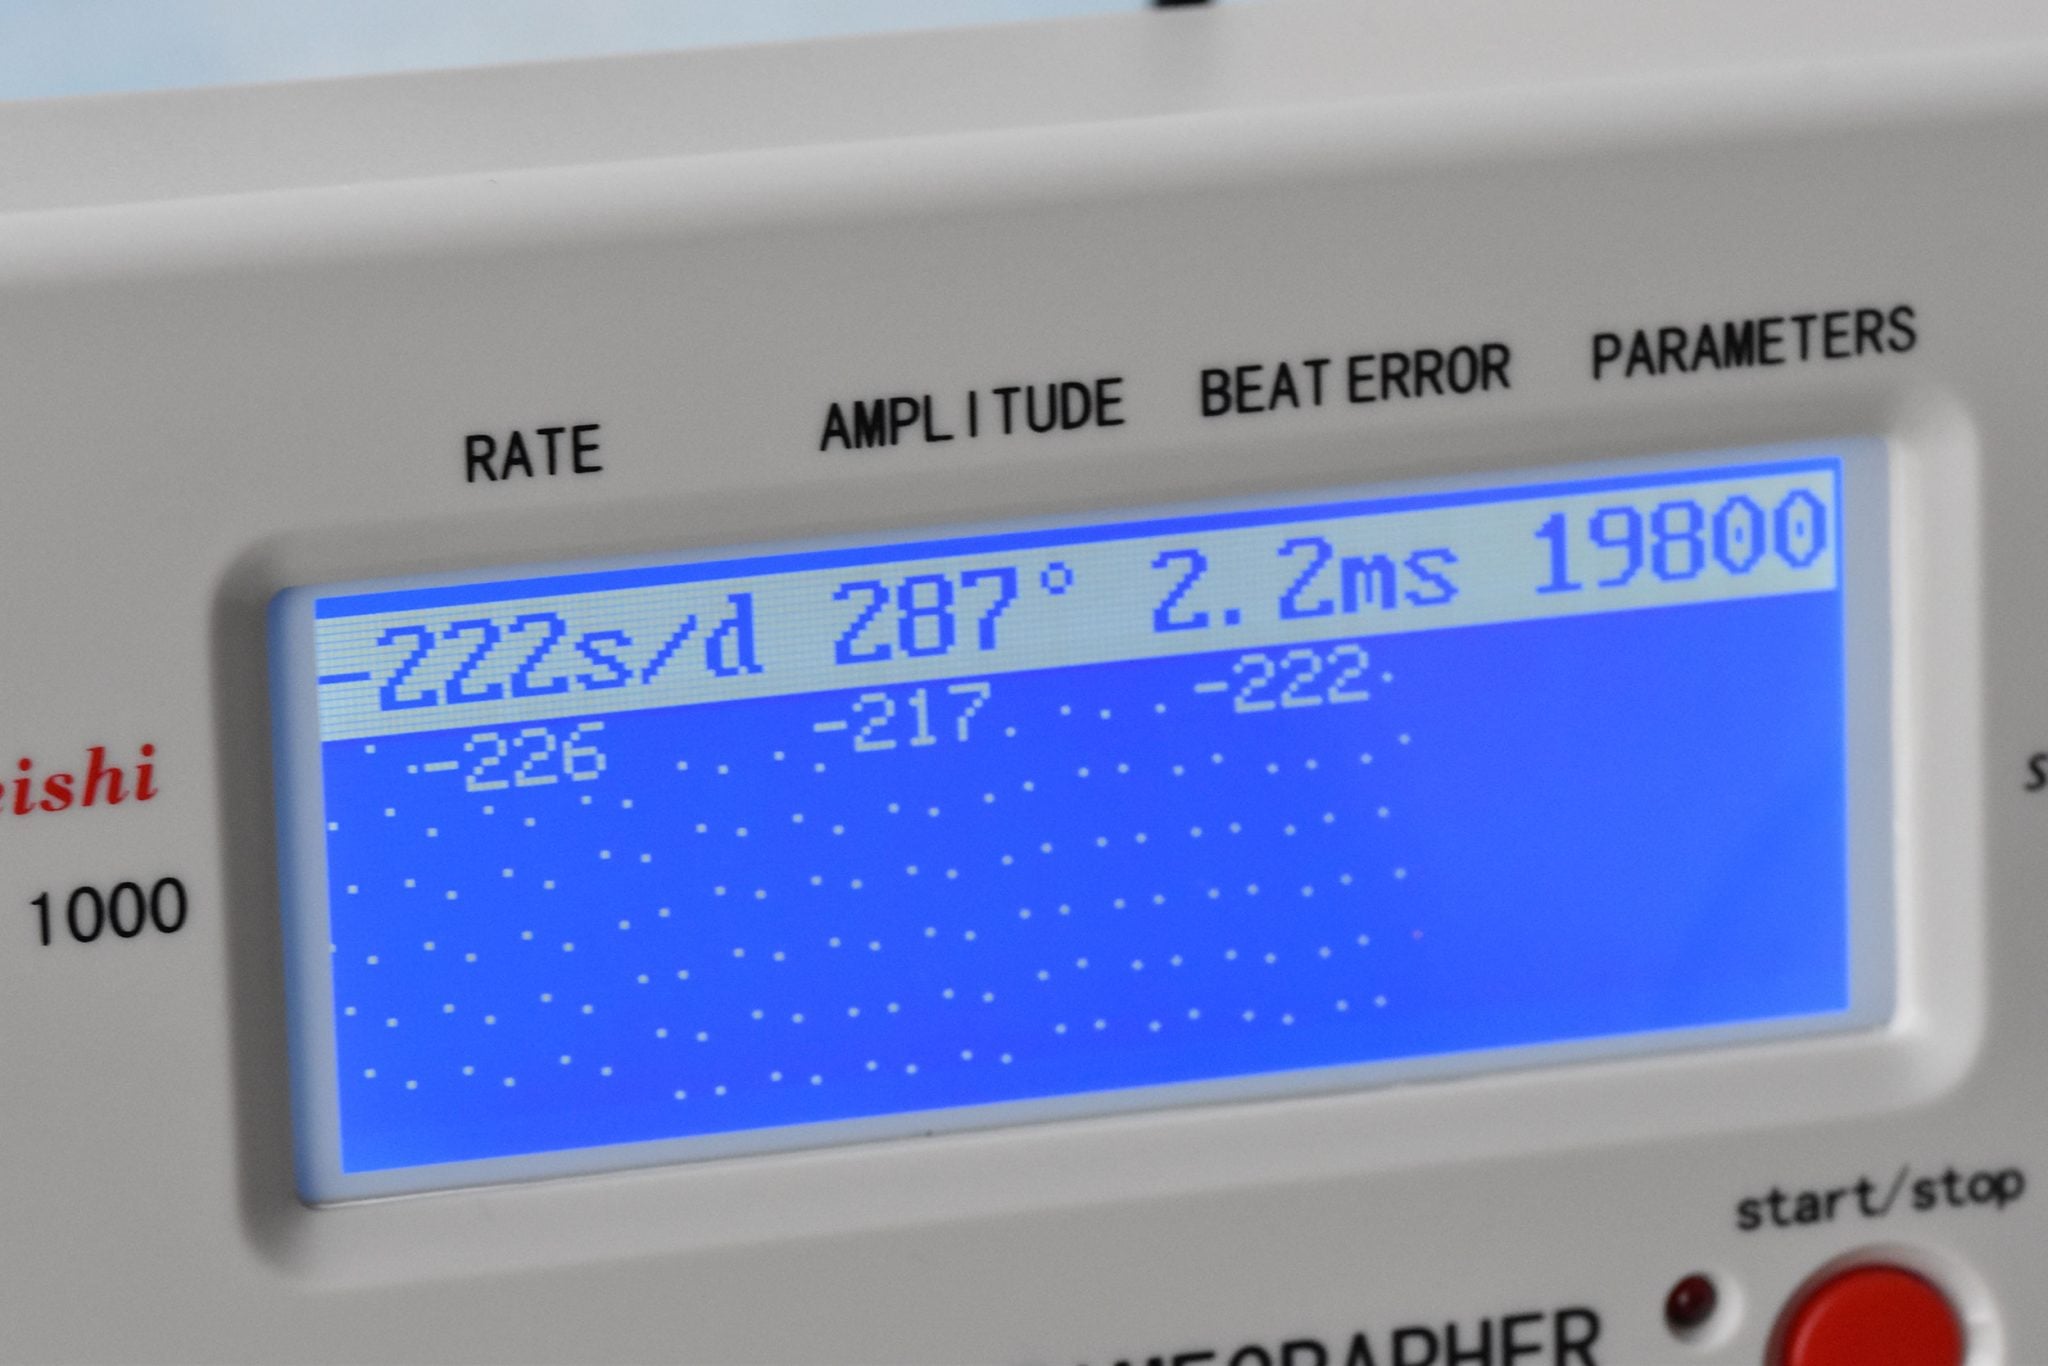
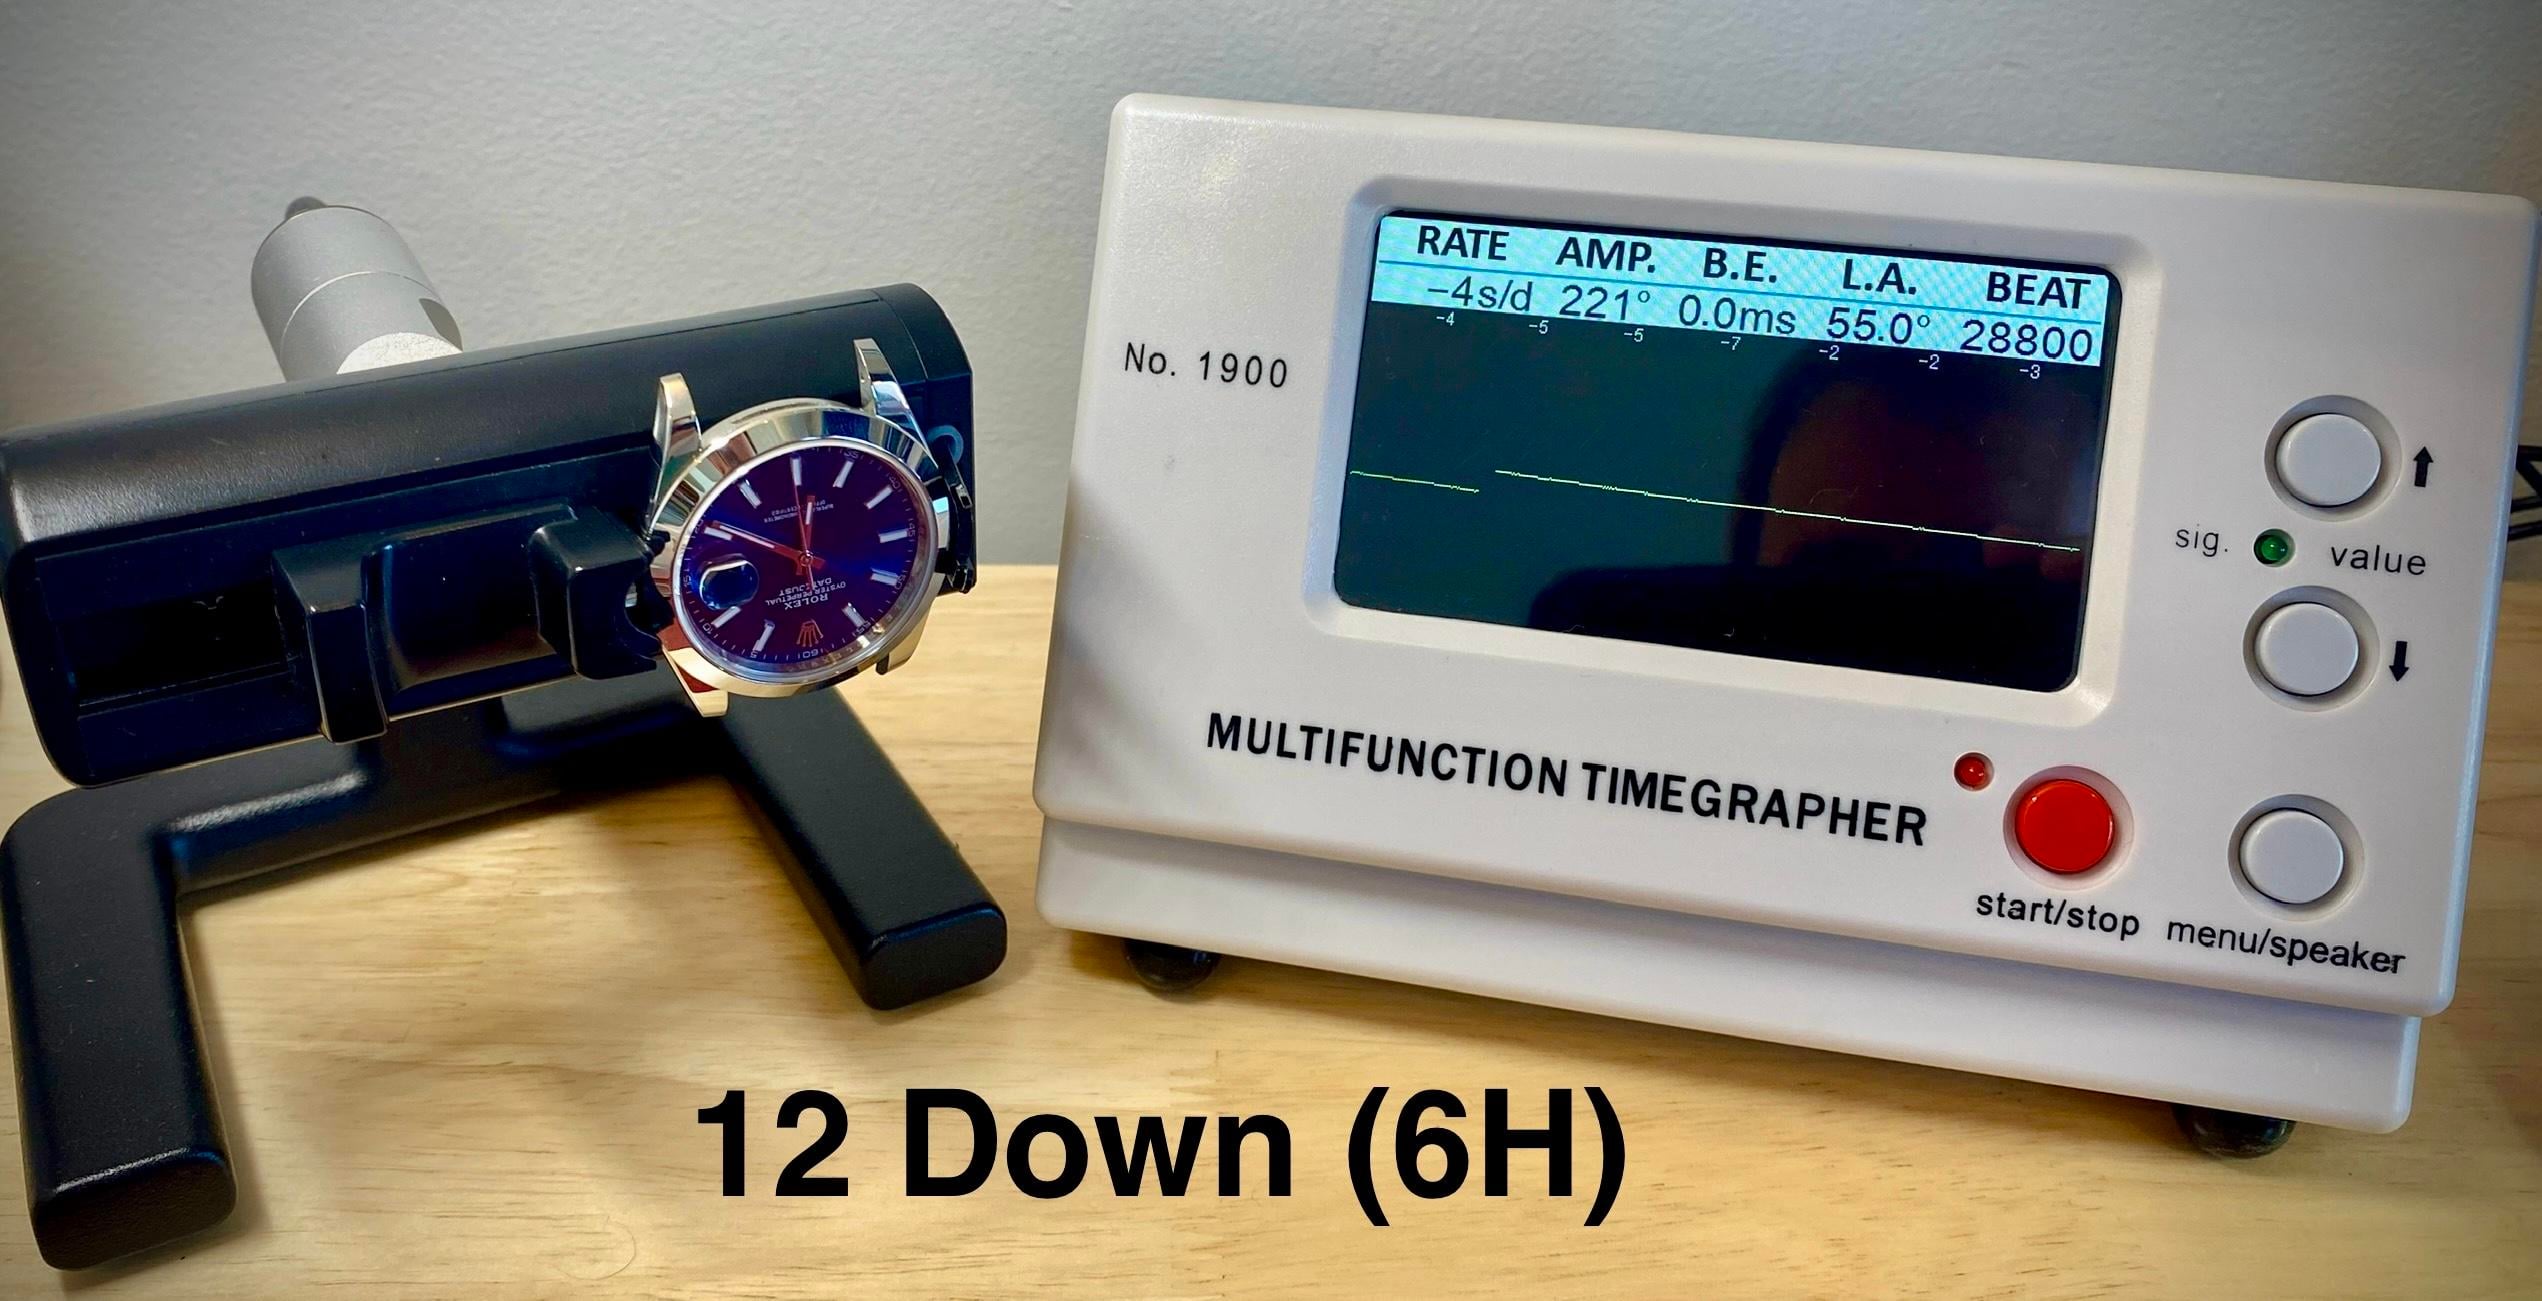
Timegrapher Results — Reading the Numbers
The timegrapher is a machine that measures the movement’s performance. QC photos typically include a timegrapher screen showing four critical values:
Rate is the most important number. A rate of +5 s/d means the watch gains 5 seconds per day — completely normal and within COSC certification standards (±4-6 s/d). A rate of +20 s/d means the movement needs regulation — a $30 fix, but you shouldn’t need it on a new super clone. Negative rates (losing time) are slightly more concerning than positive rates (gaining time) because they can indicate low amplitude.
Amplitude indicates the health of the mainspring and gear train. Low amplitude (<250°) suggests the movement needs service or has a manufacturing defect. High amplitude (>320°) can indicate an overbanking issue. The sweet spot is 270-300°.
Beat error measures how symmetrically the balance wheel oscillates. Think of it like a car engine running smoothly vs. misfiring. Below 0.5ms is excellent. Between 0.5-1.0ms is acceptable. Above 1.0ms needs adjustment.
Brand-Specific QC Checks — What to Look for Beyond the Basics
Each brand has specific elements that require attention beyond the universal checks above:
Rolex: Cyclops magnification (should be 2.5x — date fills the window). Glidelock clasp operation. Crown guard symmetry (Submariner). Coronet quality at 12 o’clock. Rehaut engraving alignment. For details on Rolex super clones, see our Rolex collection.
Omega Seamaster: Wave dial pattern depth and direction. Ceramic bezel color match (especially the blue — it’s notoriously tricky). Helium escape valve. Transparent case back movement decoration. See Omega collection.
Audemars Piguet Royal Oak: Tapisserie pattern depth and uniformity. Octagonal bezel screw alignment (all 8 screws should be at the same angle). Integrated bracelet gap at case junction. See AP collection.
Patek Philippe Nautilus: Horizontal line gradient on dial (deeper center, shallower edges). Ear symmetry (the Nautilus “ears” should be mirror-image identical). Case thickness (should be 8.3mm — thick Nautilus = instant tell). See Patek collection.
Cartier Santos: Screw alignment on bezel (all should be same angle). Blue of hands and numerals. SmartLink functionality. See Cartier collection.
The Complete QC Checklist — Print This
Use this checklist for every QC review. Rate each item as Pass, Acceptable, or Fail:
FAQ — 15 QC Questions Answered
Q: How many times can I RL a watch?
With us, there’s no hard limit. Most orders GL on the first or second piece. If a specific model consistently has issues (rare), we’ll discuss alternatives or different factory options. The QC process exists to protect you — use it freely.
Q: Do QC photos cost extra?
No. QC photos are included with every order. They’re a standard part of our process. You’ll receive 8-12 photos of your specific watch before it ships.
Q: How long after ordering do I receive QC photos?
Typically 3-7 days, depending on factory stock. Popular models (Submariner, Seamaster) are usually in stock and QC photos arrive within 2-3 days. Less common models may take 5-7 days as the factory produces or selects a piece.
Q: Can I request specific angles in QC photos?
Yes. If you want to see a specific detail — the lume shot, a macro of the cyclops, or the case back engraving — let us know and we’ll include it. We want you to have all the information needed to make a confident GL decision.
Q: The colors look different in QC photos vs. what I see online. Is something wrong?
Probably not. QC photos are taken under specific lighting that doesn’t always match daylight or flash photography you see online. Blue dials look different under warm vs. cool lighting. Sunburst dials shift dramatically depending on the angle. Judge alignment and structure from QC photos. Judge color in person.
Q: I’m not confident evaluating QC photos. Can you help?
Absolutely. That’s part of our service. We pre-screen every piece before sending QC photos — obvious defects never make it to you. If you’re unsure about a specific detail, send us your concern and we’ll evaluate it honestly. We want you happy, not stuck with a piece you’re uncertain about.
Q: What if the watch looks different in person than in QC photos?
In most cases, the watch looks better in person than in QC photos. QC lighting is harsh and reveals every micro-detail. On the wrist, under natural light, the finishing looks smoother and the overall presentation improves. Alignment issues that looked concerning in macro photos become invisible at normal viewing distance.
Q: Do DHGate sellers provide QC photos?
No. This is one of the fundamental differences between the super clone buying process and marketplace buying. DHGate sellers ship whatever they grab off the shelf. No individual inspection, no approval process, no quality control. You get what you get. This is also covered in detail in our super clone vs cheap replica comparison.
Q: Is it normal for the timegrapher to show different readings in different positions?
Yes, completely normal. Mechanical watches perform differently in different positions (dial up, dial down, crown up, crown down, etc.). QC timegraphers typically test in the dial-up position. A well-regulated movement will show consistent readings across positions, but variations of 3-5 s/d between positions are standard even for genuine Swiss watches.
Q: Should I RL if the timegrapher shows +8 s/d?
No. +8 s/d is within normal range and easily regulated to ±2 s/d by any watchmaker ($20-30). RL for timing only if the rate exceeds ±15 s/d, the amplitude is below 250°, or the beat error exceeds 1.0ms. These indicate movement issues that regulation alone won’t fix.
Q: What’s the most common reason for RL?
Dial misalignment, followed by bezel alignment issues. Together these account for ~60% of RLs. Case finishing defects (scratches) are the third most common. Timegrapher-based RLs are relatively rare — maybe 5-8% of cases — because factories test movements before assembly.
Q: How do I zoom into QC photos properly?
View on a large screen (laptop/desktop), not on your phone. Phone screens are too small to evaluate fine details. Use your image viewer’s zoom function to check dial alignment, rehaut, and date window. But remember — if you need 10x zoom to see a flaw, it doesn’t exist on the wrist.
Q: Can QC photos be faked?
By unscrupulous dealers — theoretically yes. This is why buying from an established dealer with a track record matters. We photograph every piece in-house with consistent lighting and backgrounds. Our QC photos show your specific watch, not stock images. If you want verification, request a photo with a specific date/time written on a card next to the watch.
Q: I GLed my watch but found an issue after receiving it. What now?
Contact us. If it’s something that wasn’t visible in QC photos (a movement issue, for example), we’ll work with you to resolve it. Some issues — like timing regulation — can be handled locally by any watchmaker. Others may require returning the piece. We stand behind our products after sale.
Q: What’s the single most important QC check?
Dial alignment. Everything else can be minor — a slightly off bezel resets with a click, a timing issue is a $30 regulation, SEL gaps are invisible on the wrist. But a crooked dial looks wrong every time you glance at your watch. If the dial is straight, you’re probably looking at a GL piece.
QC Photos Are Your Insurance Policy
The QC process exists to eliminate the lottery. You see exactly what you’re getting before it ships. Use the checklist above, focus on the details that matter, and don’t over-RL for issues only visible under 10x magnification. When you’re ready to order, browse our brand-by-brand guide or go straight to our collections. Every piece ships with full QC photos — always.